How to use the backup wizard in cpanel?
What do you mean by a backup wizard in a cpanel?
In a web hosting cPanel, the Backup wizard is an easy interface for creating and restoring backups. The backup will be done for the complete website or for the part of the website. Likewise, the backup files will be restored. The backup files will be downloaded to the local machine or transferred to a remote server through FTP. The Backup wizard will be found beneath the Files section of the cPanel. This feature will be very helpful for taking local backups during the time of server migration.
If you make use of our cPanel for your hosting services. Then the cPanel will offer a very simple and powerful tool for creating and restoring the backups in a panel. cPanel hosting plan provides the good features for the user with which the user will be able to make changes or perform numerous operations related to the server or the website hosted on it.
Steps to use the backup wizard in cpanel:
Step-1: Login to cpanel
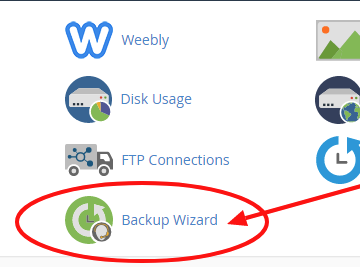
Step-2: Select Backup Wizard from Files section
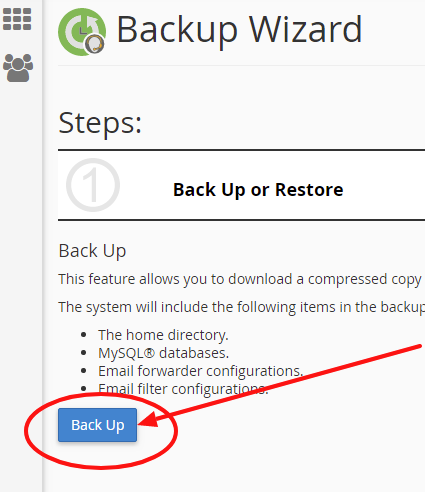
Step-3: Click on the Back up button
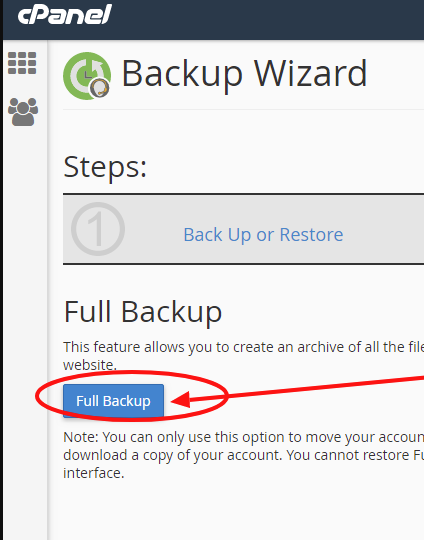
Step-4: Click on the Full backup
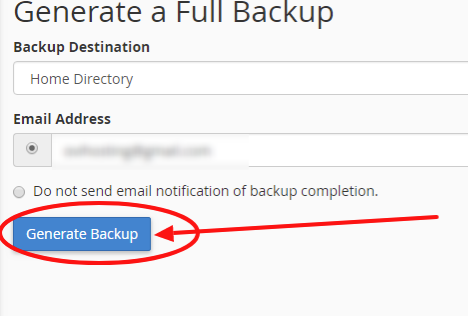
Step 5: After you click on full backup >> Choose where you want to save your backup and you can also add email to notify when the backup is complete
The option for saving your backup
Home Directory: The backup file will be saved on the server.
Remote FTP Server: the backup file will be stored on a remote server using FTP
Remote FTP Server (passive mode transfer): the backup file will be stored on a remote server using passive FTP
Secure Copy (SCP): The backup file will be stored on a remote server using SCP
Important: The Remote FTP Server, Remote FTP Server (passive mode transfer), or SCP destination options can only be selected by advanced users.and when these options are selected you need to enter information on remote servers in the checkbox
If you need to be notified when the backup process is completed then you need to enter your email address in the text box and to disable notifications, select the checkbox Do not send email notification of backup completion
Step-6: Add click on the Generate Backup button
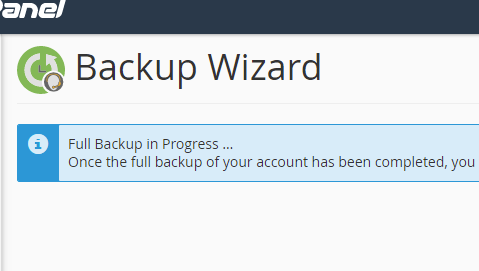
Step-7: Your backup will be under progress and will look like the below screenshot
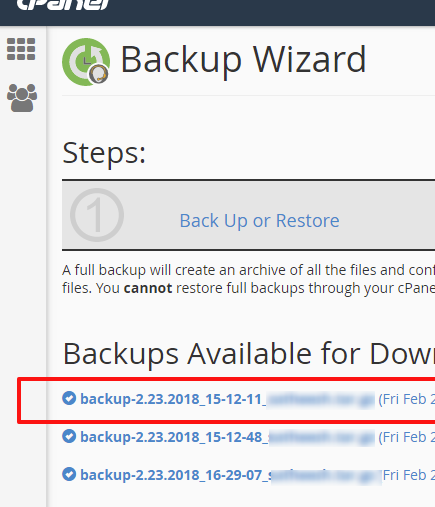
Step 8: As soon as your backup completes it will look like the below screenshot and you can download the backup by clicking on it.
The backup file's creation date appears in the filename, which begins with a backup-MM-DD-YYYY string, where MM represents the month, DD represents the date, and YYYY represents the year and the system stores full backup files as tarballs that use the .tar.gz file extension.
Following the above steps, you can take backup using the backup wizard in your cpanel
Steps to take a partial backup
Step 1: Login cpanel >> backup wizard >>click on backup
Step 2: under partial backup select the backup which is needed
Home directory: To restore the /home directory
MySQL databases: To restore databases
Email Forwarders Filters: to restore mail forwarders or filters.
Step 3: The Download section of the interface will appear >> Click the desired backup file to download it.
Note:
When you create a partial backup, the backup type determines the backup file's extension.
The backup file's extension depends on the portion of your site that you backed up.
For Home directory- *tar.gz
MySQL databases: *.sql
Email Forwarders & Filters: *.net, *.com
When you back up your home directory, all of the files that you own and files that you do not own, but to which you possess access, will also be taken back up.
Steps to restore files using the backup wizard:
You can also Restore files using the backup wizard, to restore a file or folder from an existing backup, follow the below steps:
Step 1: In cPanel >> Backup Wizard >> click on Restore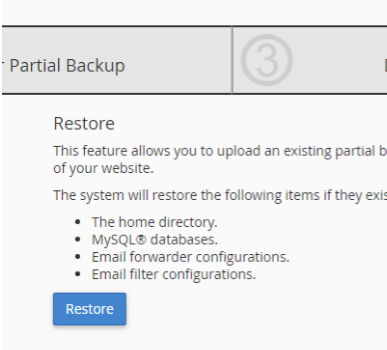
Step 2:Select the type of file or directory which should be restored :
Home directory: To restore the /home directory
MySQL databases: To restore databases
Email Forwarders & Filters configuration: to restore mail forwarders or filters configuration
Step 3: In restore interface section >> select the file which should be uploaded
Step 4: And click on upload to restore the backup.
Important things to consider before you start your backup
1) Ensure to check the disk availability before you start the backup process. When you don't have enough disk space left, then the backup process will break in-between and also, your website will stop working. Assume you have used the disk space of around 1GB, then ensure that at least 55% of them is available for backup.
2) Verify the remaining amount of inode limit. If you don't have enough inode count, then also backup can break.
3) ANOTHER IMPORTANT POING TO CONSIDER WHEN TAKING A BACKUP IN CPANEL IS, do not take backup again & again without deleting your old backup. Once you take the backup, ensure to download to your local system. If you don't delete the old backups before taking the new backup, then your backup size will keep increasing, it will affect your disk quota and also website functionality. Make sure to always keep one copy of the backup in the server.
Note:
>> You must download and compress the backup file prior to restoration.
>> After you decompress the backup file, you can upload and restore individual portions of your website that the full backup file contains.
>>The backup process for an account near or over its quota may fail because the system cannot write necessary files, such as a database lock file.
If you are facing any issue or if you have any clarification, feel free to contact our support team via live chat, email, toll-free or ticket system and our support team is available 24/7.