How to Create Custom Error Pages in cPanel?
Sometime when a visitor to your website gets an error message, for example 400 (Bad request), 403 (Forbidden), or 500 (Internal server error), they will be seeing the default error pages. But if you want you can easily customize these pages using cPanel’s error pages option. Here in this help section we are going to discuss about how to create custom error page in your web hosting account.
Creating a Custom Error page in cPanel
Login to cPanel of your website.
Locate Advanced section in cPanel and click error pages.

You may have multiple domain name under one cPanel account, select the one for which you want to create custom error pages from the Managing menu.
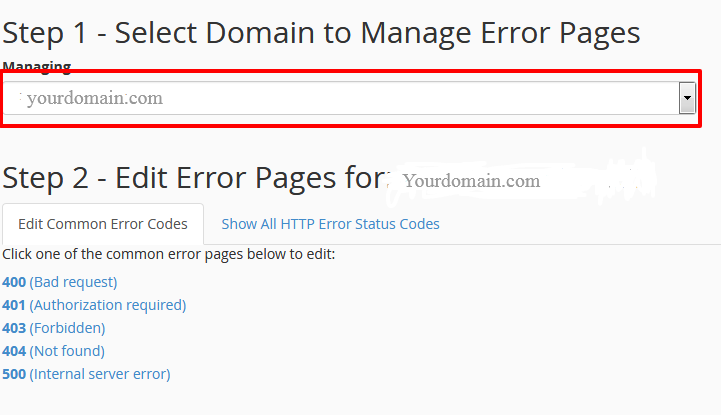
Here on this step you will find the list of most common errors, hit the one you are planning to design a customized error page for. The available options to choose from are 400 (Bad request), 401 (Authorization required), 403 (Forbidden), 404 (Not found) etc. Hit show all HTTP code if you want to see additional error codes. Hit the option you want to edit. Here I am going to select 404 error code.
Once you hit your desired option you will be landed on editor page. You can type HTML program in the text box given or just insert redefined tags if you wish.
Once you are done hit the save button.
Setting up your .htaccess File
By pressing right click of your mouse edit the .htaccess file and create a rule for the error pages you created. You can file .htaccess file inside the public_html of your file manager. Given below is the sample of the file formatting:
ErrorDocument 404 /404.shtml
ErrorDocument 402 /402.shtml
ErrorDocument 410 /410.shtml
ErrorDocument 414 /414.shtml
Save your .htaccess file and now when someone visit your website and an error message trigger, it will display your custom error page which you created for particular error code.
Facing any difficulty? Don’t worry our support team is here to help. Contact our Support team now.