Managed hosting for WordPress powered by Rocket.net
How to create a staging site on hostingraja.in Managed WordPress
Learn how to create a staging site to test changes and new ideas before you take them live.
Making changes to your live, revenue generating site can be problematic and even devastating. A staging site is designed to let you test new themes, plugins, style changes, and even trying new ways to create posts and articles, all without making changes to your live website.You can think of a staging site as a sandbox to play in without affecting your live website.Creating a staging site
Staging is only supported for standalone WordPress installations. Multisites cannot be staged.
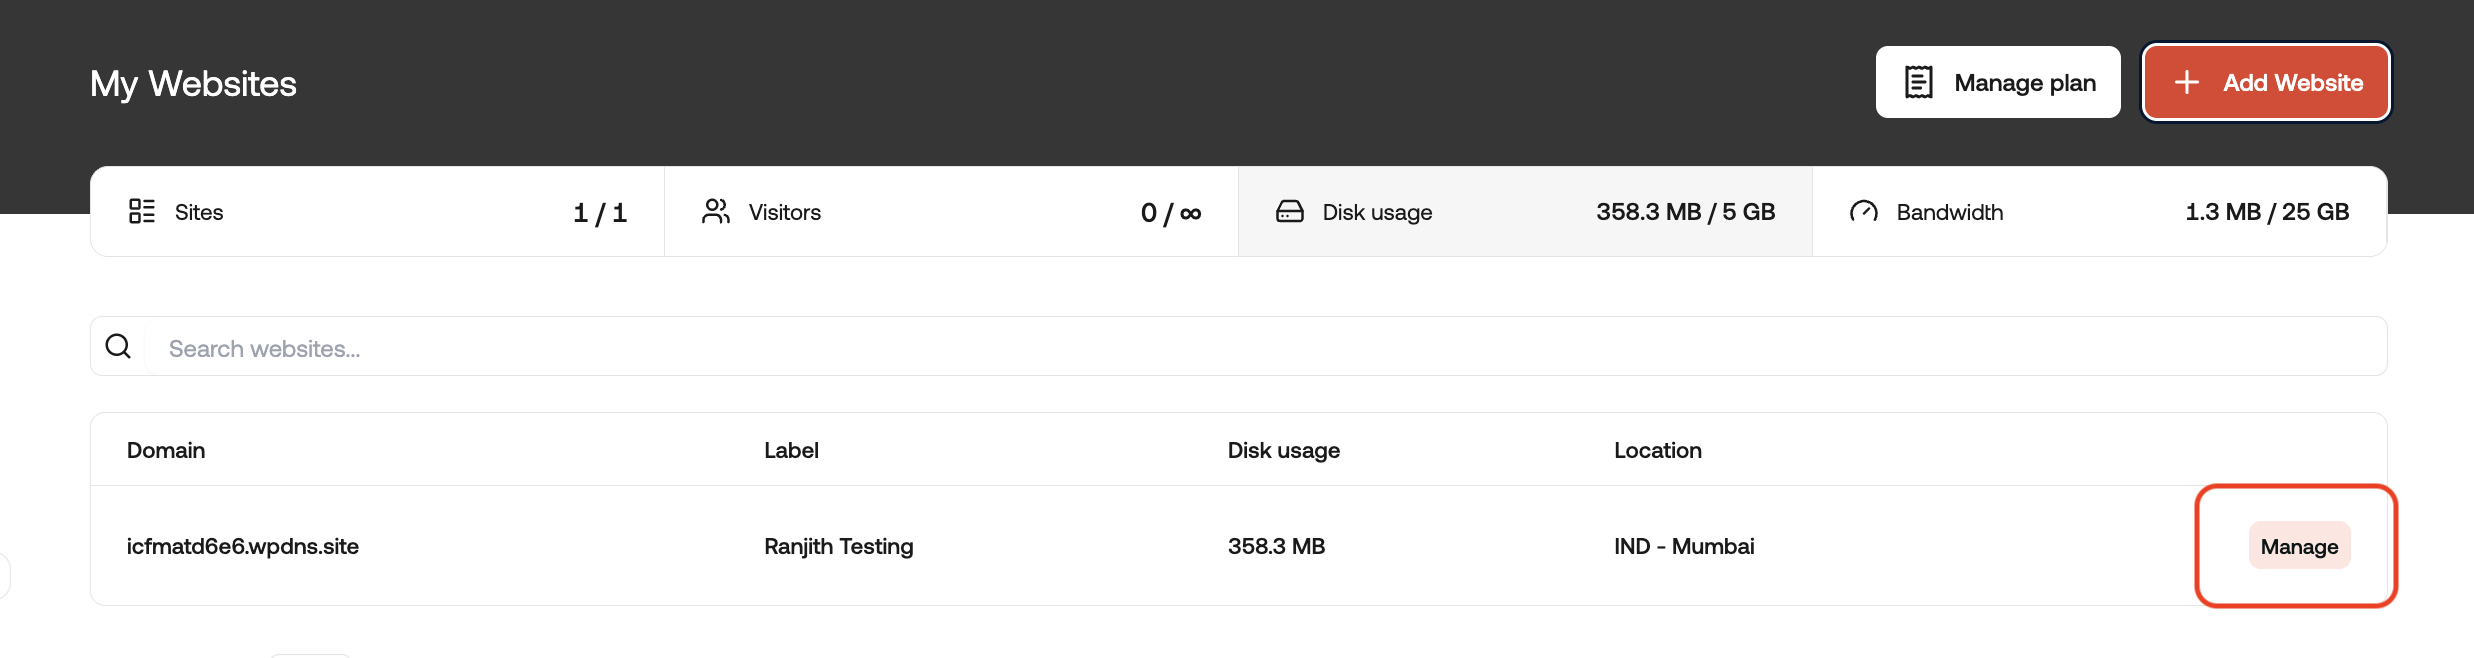
On the My Websites page, locate the site, and then click Manage:
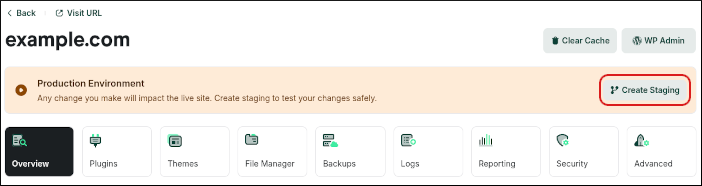
On the hostingraja.in dashboard, click Create Staging:
This process can take a few moments to complete. When it does, a message appears stating you are in staging mode. You can now work with the staging site to perfect the changes you’d like to make.
Publishing your staging siteWhen you’re ready to make the staging site live, click Publish in the top right corner.
Publishing a staging site overwrites your live site.
Deleting your staging siteTo delete your staging site, follow these steps:
Confirm that the staging site is selected the top left corner, where the white box says staging.
Click Delete Staging to the right.
Deleting a staging site is not reversible — when you delete it, it is gone for good.
{"docsConfig":{"theme":"mint","$schema":"https://mintlify.com/docs.json","name":"HostingRaja Help","colors":{"primary":"#048ef5","light":"#4db2ff","dark":"#0374c9"},"logo":{"light":"https://mintcdn.com/hostingraja/Y5nkC5TlKpjVjMhh/logo/logo.light.svg?fit=max\u0026auto=format\u0026n=Y5nkC5TlKpjVjMhh\u0026q=85\u0026s=613179cfcdaefe0fba57351955131b39","dark":"https://mintcdn.com/hostingraja/Y5nkC5TlKpjVjMhh/logo/logo.dark.svg?fit=max\u0026auto=format\u0026n=Y5nkC5TlKpjVjMhh\u0026q=85\u0026s=2b11c8347a3b65d1dd2e8ae9cff7cae7"},"favicon":"https://mintlify.s3.us-west-1.amazonaws.com/hostingraja/favicon.svg","navbar":{"primary":{"type":"button","label":"Dashboard","href":"https://www.hostingraja.in/contact/"}},"footer":{"socials":{"website":"https://www.hostingraja.in"}},"contextual":{"options":["copy","view","chatgpt","claude","perplexity","mcp","cursor","vscode"],"display":"header"},"styling":{"latex":true},"navigation":{"pages":[]}},"deployment":{"deploymentMetadataValue":{"subdomain":"hostingraja","hasAudioNarration":false,"actualSubdomain":"hostingraja","customDomains":["help.hostingraja.in"],"gitSource":{"type":"github","owner":"panaras10","repo":"hostingrajalivedocuments","deployBranch":"main","contentDirectory":"","isPrivate":true,"mountPath":"","label":""},"chroma":{"collectionId":"0b787e24-1da3-497d-8ab0-7f8203cd2d05","liveDeploymentHistoryId":"6ab63353e55f22cb08d206a1","schemaVersion":"v3","latestBuiltDeploymentHistoryId":"6ab63353e55f22cb08d206a1"},"entitlements":{},"buildId":"6ab63353e55f22cb08d206a1","clientVersion":"0.0.3966","searchFilterCounts":[{"language":"default","tag":"Documentation","count":154},{"language":"default","tag":"Managed hosting for WordPress powered by Rocket.net","count":62},{"language":"default","tag":"How Tos","count":48},{"language":"default","tag":"cPanel Article","count":38},{"language":"default","tag":"Email-Help","count":25},{"language":"default","tag":"Using your hostingraja.in Panel","count":23},{"language":"default","tag":"Using Your hostingraja.in Shared Panel","count":14},{"language":"default","tag":"Error Troubleshoot","count":14},{"language":"default","tag":"Enhance Control Panel","count":11},{"language":"default","tag":"wordpress","count":9}]},"assistantConfig":{"enableAskAiButton":false,"enableStarterQuestions":false,"enableContextualStarterQuestions":false,"enableAskAiSearchBar":true},"hasChatPermissions":false,"hasWebMcpPermissions":false,"toggles":[{"name":"kill-isr","enabled":true,"variant":{"name":"disabled","enabled":false,"feature_enabled":true},"impressionData":false},{"name":"agent-mintlify-slack","enabled":true,"variant":{"name":"disabled","enabled":false,"feature_enabled":true},"impressionData":false},{"name":"editor-v7-file-tree","enabled":true,"variant":{"name":"disabled","enabled":false,"feature_enabled":true},"impressionData":false},{"name":"agent-integrations-settings","enabled":true,"variant":{"name":"disabled","enabled":false,"feature_enabled":true},"impressionData":false},{"name":"automations-pr-grouping","enabled":true,"variant":{"name":"disabled","enabled":false,"feature_enabled":true},"impressionData":false},{"name":"custom-prefix","enabled":true,"variant":{"name":"disabled","enabled":false,"feature_enabled":true},"impressionData":false},{"name":"analytics-v7","enabled":true,"variant":{"name":"disabled","enabled":false,"feature_enabled":true},"impressionData":false},{"name":"user-flows-analytics","enabled":true,"variant":{"name":"disabled","enabled":false,"feature_enabled":true},"impressionData":false},{"name":"no-publish-flow","enabled":true,"variant":{"name":"disabled","enabled":false,"feature_enabled":true},"impressionData":false},{"name":"workos-onboarding","enabled":true,"variant":{"name":"disabled","enabled":false,"feature_enabled":true},"impressionData":false},{"name":"llms-txt-v2","enabled":true,"variant":{"name":"disabled","enabled":false,"feature_enabled":true},"impressionData":false},{"name":"pause-universal-search-reconcile","enabled":true,"variant":{"name":"disabled","enabled":false,"feature_enabled":true},"impressionData":false},{"name":"snapshot-serving-live","enabled":true,"variant":{"name":"disabled","enabled":false,"feature_enabled":true},"impressionData":false},{"name":"stripTemperatureMiddleware","enabled":true,"variant":{"name":"disabled","enabled":false,"feature_enabled":true},"impressionData":false},{"name":"per-site-search-delta","enabled":true,"variant":{"name":"disabled","enabled":false,"feature_enabled":true},"impressionData":false},{"name":"support-platform-pylon-zendesk","enabled":true,"variant":{"name":"disabled","enabled":false,"feature_enabled":true},"impressionData":false},{"name":"snapshot-serving","enabled":true,"variant":{"name":"disabled","enabled":false,"feature_enabled":true},"impressionData":false},{"name":"instant-rollback","enabled":true,"variant":{"name":"disabled","enabled":false,"feature_enabled":true},"impressionData":false},{"name":"granular-notifications-server","enabled":true,"variant":{"name":"disabled","enabled":false,"feature_enabled":true},"impressionData":false},{"name":"granular-notifications","enabled":true,"variant":{"name":"disabled","enabled":false,"feature_enabled":true},"impressionData":false},{"name":"editor-private-page-search","enabled":true,"variant":{"name":"disabled","enabled":false,"feature_enabled":true},"impressionData":false},{"name":"automations-fable","enabled":true,"variant":{"name":"disabled","enabled":false,"feature_enabled":true},"impressionData":false},{"name":"fixed-ai-action-pricing","enabled":true,"variant":{"name":"disabled","enabled":false,"feature_enabled":true},"impressionData":false},{"name":"automation-resolve-merge-conflict","enabled":true,"variant":{"name":"disabled","enabled":false,"feature_enabled":true},"impressionData":false},{"name":"scoped-publishing","enabled":true,"variant":{"name":"disabled","enabled":false,"feature_enabled":true},"impressionData":false},{"name":"mintql","enabled":true,"variant":{"name":"disabled","enabled":false,"feature_enabled":true},"impressionData":false},{"name":"page-level-analytics","enabled":true,"variant":{"name":"disabled","enabled":false,"feature_enabled":true},"impressionData":false},{"name":"editor-version-history-v2","enabled":true,"variant":{"name":"disabled","enabled":false,"feature_enabled":true},"impressionData":false},{"name":"editor-nav-generations","enabled":true,"variant":{"name":"disabled","enabled":false,"feature_enabled":true},"impressionData":false},{"name":"billing-page-v2","enabled":true,"variant":{"name":"disabled","enabled":false,"feature_enabled":true},"impressionData":false},{"name":"workspace-projects","enabled":true,"variant":{"name":"disabled","enabled":false,"feature_enabled":true},"impressionData":false},{"name":"assistant-v5","enabled":true,"variant":{"name":"disabled","enabled":false,"feature_enabled":true},"impressionData":false},{"name":"byok-sep-25","enabled":true,"variant":{"name":"disabled","enabled":false,"feature_enabled":true},"impressionData":false},{"name":"fork-pr-previews","enabled":true,"variant":{"name":"disabled","enabled":false,"feature_enabled":true},"impressionData":false},{"name":"revalidation-jwt","enabled":true,"variant":{"name":"disabled","enabled":false,"feature_enabled":true},"impressionData":false},{"name":"vite-origin","enabled":true,"variant":{"name":"disabled","enabled":false,"feature_enabled":true},"impressionData":false},{"name":"editor-agent-model-picker","enabled":true,"variant":{"name":"disabled","enabled":false,"feature_enabled":true},"impressionData":false},{"name":"billing-updated-9-15","enabled":true,"variant":{"name":"disabled","enabled":false,"feature_enabled":true},"impressionData":false},{"name":"hobby-abuse-scan","enabled":true,"variant":{"name":"disabled","enabled":false,"feature_enabled":true},"impressionData":false},{"name":"dashboard-inbox","enabled":true,"variant":{"name":"disabled","enabled":false,"feature_enabled":true},"impressionData":false}],"isAtlas":false,"googleFontsInlined":false},"customCss":[],"page":{"pagePath":"docs/how-to-create-a-staging-site-on-hostingrajain-managed-wordpress","slug":"/docs/how-to-create-a-staging-site-on-hostingrajain-managed-wordpress","pageMetadata":{"title":"How to create a staging site on hostingraja.in Managed WordPress","description":"Learn how to create a staging site to test changes and new ideas before you take them live.","href":"/docs/how-to-create-a-staging-site-on-hostingrajain-managed-wordpress"},"description":{"compiledSource":"\"use strict\";\nconst {jsx: _jsx} = arguments[0];\nconst {useMDXComponents: _provideComponents} = arguments[0];\nfunction _createMdxContent(props) {\n const _components = {\n p: \"p\",\n ..._provideComponents(),\n ...props.components\n };\n return _jsx(_components.p, {\n children: \"Learn how to create a staging site to test changes and new ideas before you take them live.\"\n });\n}\nfunction MDXContent(props = {}) {\n const {wrapper: MDXLayout} = {\n ..._provideComponents(),\n ...props.components\n };\n return MDXLayout ? _jsx(MDXLayout, {\n ...props,\n children: _jsx(_createMdxContent, {\n ...props\n })\n }) : _createMdxContent(props);\n}\nreturn {\n default: MDXContent\n};\n","frontmatter":{},"scope":{}},"pageType":"default","mdx":{"mdxSource":{"compiledSource":"\"use strict\";const{Fragment:_Fragment,jsx:_jsx,jsxs:_jsxs}=arguments[0];const{useMDXComponents:_provideComponents}=arguments[0];function _createMdxContent(props){const _components={a:`a`,img:`img`,li:`li`,ol:`ol`,p:`p`,..._provideComponents(),...props.components},{Note,Warning}=_components;if(!Note)_missingMdxReference(`Note`,true);if(!Warning)_missingMdxReference(`Warning`,true);return _jsxs(_Fragment,{children:[_jsx(_components.p,{children:`Making changes to your live, revenue generating site can be problematic and even devastating. A staging site is designed to let you test new themes, plugins, style changes, and even trying new ways to create posts and articles, all without making changes to your live website.`}),`\n`,_jsx(_components.p,{children:`You can think of a staging site as a sandbox to play in without affecting your live website.`}),`\n`,_jsx(_components.p,{children:`Creating a staging site`}),`\n`,_jsx(Note,{children:_jsx(_components.p,{children:`Staging is only supported for standalone WordPress installations. Multisites cannot be staged.`})}),`\n`,_jsx(_components.p,{children:`To create a staging site, follow these steps:`}),`\n`,_jsxs(_components.ol,{children:[`\n`,_jsxs(_components.li,{children:[`Log in to the Hosting Panel at `,_jsx(_components.a,{href:`https://clients.hostingraja.in/`,children:`https://clients.hostingraja.in/`})]}),`\n`,_jsxs(_components.li,{children:[`In the left sidebar, click Managed WordPress:\n`,_jsx(_components.img,{src:`https://files.readme.io/92e491a9b0eca82a8043e97cb191e9e7f9545e0049d7a1492954e8869a244a29-image.png`,alt:``})]}),`\n`,_jsxs(_components.li,{children:[`On the My Websites page, locate the site, and then click Manage:\n`,_jsx(_components.img,{src:`https://files.readme.io/6b6ef750ce779d1417ee0efff7b9652eb66b5decb1a7dde39f8b3a172d465048-image.png`,alt:``})]}),`\n`,_jsxs(_components.li,{children:[`On the hostingraja.in dashboard, click Create Staging:\n`,_jsx(_components.img,{src:`https://files.readme.io/c57a6056e1878c19a47fe89c351bd1ad00c09fe1a52480bbba1a753b5b4b43db-image.png`,alt:``})]}),`\n`,_jsx(_components.li,{children:`This process can take a few moments to complete. When it does, a message appears stating you are in staging mode. You can now work with the staging site to perfect the changes you’d like to make.`}),`\n`]}),`\n`,_jsx(_components.p,{children:`Publishing your staging site`}),`\n`,_jsx(_components.p,{children:`When you’re ready to make the staging site live, click Publish in the top right corner.`}),`\n`,_jsx(Warning,{children:_jsx(_components.p,{children:`Publishing a staging site overwrites your live site.`})}),`\n`,_jsx(_components.p,{children:`Deleting your staging site`}),`\n`,_jsx(_components.p,{children:`To delete your staging site, follow these steps:`}),`\n`,_jsxs(_components.ol,{children:[`\n`,_jsx(_components.li,{children:`Confirm that the staging site is selected the top left corner, where the white box says staging.`}),`\n`,_jsx(_components.li,{children:`Click Delete Staging to the right.`}),`\n`]}),`\n`,_jsx(Warning,{children:_jsx(_components.p,{children:`Deleting a staging site is not reversible — when you delete it, it is gone for good.`})})]})}function MDXContent(props={}){const{wrapper:MDXLayout}={..._provideComponents(),...props.components};return MDXLayout?_jsx(MDXLayout,{...props,children:_jsx(_createMdxContent,{...props})}):_createMdxContent(props)}return{default:MDXContent};function _missingMdxReference(id,component){throw new Error(`Expected `+(component?`component`:`object`)+\" `\"+id+\"` to be defined: you likely forgot to import, pass, or provide it.\")}","frontmatter":{},"scope":{"config":{},"pageMetadata":{"title":"How to create a staging site on hostingraja.in Managed WordPress","description":"Learn how to create a staging site to test changes and new ideas before you take them live.","href":"/docs/how-to-create-a-staging-site-on-hostingrajain-managed-wordpress"}}},"mdxSourceWithNoJs":null},"mdxExtracts":{"tableOfContents":[],"codeExamples":{}},"jsLinks":[],"subdomain":"hostingraja","siteName":"HostingRaja Help","title":"How to create a staging site on hostingraja.in Managed WordPress - HostingRaja Help","navMaps":{"firstHrefInVersion":{},"firstHrefInLanguage":{}},"lastModified":"2026-07-07T12:55:05.426Z","originalFileLocation":"docs/how-to-create-a-staging-site-on-hostingrajain-managed-wordpress.mdx"},"headHtml":"\u003cscript data-mint-head>(function(){var d=document.documentElement,p=null;if(!p){try{p=localStorage.getItem(\"isDarkMode\")}catch(e){}if(p==='true')p='dark';else if(p==='false')p='light';if(p!=='light'\u0026\u0026p!=='dark'\u0026\u0026p!=='system')p=\"system\"}var r=p==='system'?(matchMedia(\"(prefers-color-scheme: dark)\").matches?'dark':'light'):p;d.classList.remove(r==='dark'?'light':'dark');d.classList.add(r);d.setAttribute(\"data-theme-preference\",p)})();\u003c/script>\u003cmeta data-mint-head name=\"description\" content=\"Learn how to create a staging site to test changes and new ideas before you take them live.\">\u003cmeta data-mint-head name=\"application-name\" content=\"HostingRaja Help\">\u003cmeta data-mint-head name=\"generator\" content=\"Mintlify\">\u003clink data-mint-head rel=\"apple-touch-icon\" type=\"image/svg+xml\" sizes=\"180x180\" href=\"https://mintlify.s3.us-west-1.amazonaws.com/hostingraja/favicon.svg\">\u003clink data-mint-head rel=\"icon\" type=\"image/svg+xml\" sizes=\"32x32\" href=\"https://mintlify.s3.us-west-1.amazonaws.com/hostingraja/favicon.svg\">\u003clink data-mint-head rel=\"icon\" type=\"image/svg+xml\" sizes=\"16x16\" href=\"https://mintlify.s3.us-west-1.amazonaws.com/hostingraja/favicon.svg\">\u003clink data-mint-head rel=\"shortcut icon\" type=\"image/svg+xml\" href=\"https://mintlify.s3.us-west-1.amazonaws.com/hostingraja/favicon.svg\">\u003cmeta data-mint-head property=\"og:title\" content=\"How to create a staging site on hostingraja.in Managed WordPress - HostingRaja Help\">\u003cmeta data-mint-head property=\"og:description\" content=\"Learn how to create a staging site to test changes and new ideas before you take them live.\">\u003cmeta data-mint-head property=\"og:site_name\" content=\"HostingRaja Help\">\u003cmeta data-mint-head property=\"og:url\" content=\"https://help.hostingraja.in/docs/how-to-create-a-staging-site-on-hostingrajain-managed-wordpress\">\u003cmeta data-mint-head property=\"og:type\" content=\"website\">\u003cmeta data-mint-head property=\"og:image\" content=\"https://hostingraja.mintlify.app/_mintlify/api/og/v2?division=Managed+hosting+for+WordPress+powered+by+Rocket.net\u0026amp;title=How+to+create+a+staging+site+on+hostingraja.in+Managed+WordPress\u0026amp;description=Learn+how+to+create+a+staging+site+to+test+changes+and+new+ideas+before+you+take+them+live.\u0026amp;theme=9c47512ad60f5d2f9d0b08f5\u0026amp;signature=216072f9e04f9587d3181dc0fd0786313f1c22c6c17383b228d10ef1e382e36d\">\u003cmeta data-mint-head property=\"og:image:width\" content=\"1200\">\u003cmeta data-mint-head property=\"og:image:height\" content=\"630\">\u003cmeta data-mint-head name=\"twitter:card\" content=\"summary_large_image\">\u003cmeta data-mint-head name=\"twitter:title\" content=\"How to create a staging site on hostingraja.in Managed WordPress - HostingRaja Help\">\u003cmeta data-mint-head name=\"twitter:description\" content=\"Learn how to create a staging site to test changes and new ideas before you take them live.\">\u003cmeta data-mint-head name=\"twitter:image\" content=\"https://hostingraja.mintlify.app/_mintlify/api/og/v2?division=Managed+hosting+for+WordPress+powered+by+Rocket.net\u0026amp;title=How+to+create+a+staging+site+on+hostingraja.in+Managed+WordPress\u0026amp;description=Learn+how+to+create+a+staging+site+to+test+changes+and+new+ideas+before+you+take+them+live.\u0026amp;theme=9c47512ad60f5d2f9d0b08f5\u0026amp;signature=216072f9e04f9587d3181dc0fd0786313f1c22c6c17383b228d10ef1e382e36d\">\u003cmeta data-mint-head name=\"twitter:image:width\" content=\"1200\">\u003cmeta data-mint-head name=\"twitter:image:height\" content=\"630\">\u003cmeta data-mint-head name=\"msapplication-config\" content=\"https://mintlify.s3.us-west-1.amazonaws.com/hostingraja/_generated/favicon/browserconfig.xml?v=3\">\u003cmeta data-mint-head name=\"apple-mobile-web-app-title\" content=\"HostingRaja Help\">\u003cmeta data-mint-head name=\"msapplication-TileColor\" content=\"#048ef5\">\u003clink data-mint-head rel=\"canonical\" href=\"https://help.hostingraja.in/docs/how-to-create-a-staging-site-on-hostingrajain-managed-wordpress\">\u003clink data-mint-head rel=\"alternate\" type=\"application/xml\" href=\"/sitemap.xml\">\u003clink data-mint-head rel=\"alternate\" type=\"text/markdown\" href=\"/docs/how-to-create-a-staging-site-on-hostingrajain-managed-wordpress.md\">\u003cscript data-mint-head type=\"application/ld+json\">{\"@context\":\"https://schema.org\",\"@graph\":[{\"@type\":\"Organization\",\"@id\":\"https://help.hostingraja.in/#organization\",\"name\":\"HostingRaja Help\",\"url\":\"https://help.hostingraja.in\",\"logo\":{\"@type\":\"ImageObject\",\"url\":\"https://mintcdn.com/hostingraja/Y5nkC5TlKpjVjMhh/logo/logo.light.svg?fit=max\u0026auto=format\u0026n=Y5nkC5TlKpjVjMhh\u0026q=85\u0026s=613179cfcdaefe0fba57351955131b39\"}},{\"@type\":\"WebSite\",\"@id\":\"https://help.hostingraja.in#website\",\"name\":\"HostingRaja Help\",\"url\":\"https://help.hostingraja.in\",\"publisher\":{\"@id\":\"https://help.hostingraja.in/#organization\"}},{\"@type\":\"WebPage\",\"@id\":\"https://help.hostingraja.in/docs/how-to-create-a-staging-site-on-hostingrajain-managed-wordpress#webpage\",\"url\":\"https://help.hostingraja.in/docs/how-to-create-a-staging-site-on-hostingrajain-managed-wordpress\",\"name\":\"How to create a staging site on hostingraja.in Managed WordPress\",\"description\":\"Learn how to create a staging site to test changes and new ideas before you take them live.\",\"dateModified\":\"2026-07-07T12:55:05.426Z\",\"isPartOf\":{\"@id\":\"https://help.hostingraja.in#website\"},\"breadcrumb\":{\"@id\":\"https://help.hostingraja.in/docs/how-to-create-a-staging-site-on-hostingrajain-managed-wordpress#breadcrumb\"}},{\"@type\":\"BreadcrumbList\",\"@id\":\"https://help.hostingraja.in/docs/how-to-create-a-staging-site-on-hostingrajain-managed-wordpress#breadcrumb\",\"itemListElement\":[{\"@type\":\"ListItem\",\"position\":1,\"name\":\"Managed hosting for WordPress powered by Rocket.net\",\"item\":\"https://help.hostingraja.in/docs/hostingcom-managed-wordpress-quick-start-guide\"},{\"@type\":\"ListItem\",\"position\":2,\"name\":\"How to create a staging site on hostingraja.in Managed WordPress\",\"item\":\"https://help.hostingraja.in/docs/how-to-create-a-staging-site-on-hostingrajain-managed-wordpress\"}]},{\"@type\":[\"Article\",\"TechArticle\"],\"@id\":\"https://help.hostingraja.in/docs/how-to-create-a-staging-site-on-hostingrajain-managed-wordpress#article\",\"headline\":\"How to create a staging site on hostingraja.in Managed WordPress\",\"name\":\"How to create a staging site on hostingraja.in Managed WordPress\",\"description\":\"Learn how to create a staging site to test changes and new ideas before you take them live.\",\"url\":\"https://help.hostingraja.in/docs/how-to-create-a-staging-site-on-hostingrajain-managed-wordpress\",\"mainEntityOfPage\":{\"@id\":\"https://help.hostingraja.in/docs/how-to-create-a-staging-site-on-hostingrajain-managed-wordpress#webpage\"},\"dateModified\":\"2026-07-07T12:55:05.426Z\",\"publisher\":{\"@id\":\"https://help.hostingraja.in/#organization\"},\"isPartOf\":{\"@id\":\"https://help.hostingraja.in#website\"}}]}\u003c/script>\u003cscript data-mint-head type=\"application/ld+json\">{\"@context\":\"https://schema.org\",\"@type\":\"WebSite\",\"name\":\"HostingRaja Help\",\"creator\":{\"@type\":\"Organization\",\"name\":\"Mintlify\",\"url\":\"https://mintlify.com\"}}\u003c/script>","siteName":"HostingRaja Help","nav":{"global":null,"pages":[{"title":"HostingRaja Knowledge Base","mode":"custom","hidden":true,"href":"/index"},{"group":"Documentation","pages":[{"group":"G-SUITE","pages":[{"title":"G-SUITE","href":"/docs/gsuite"},{"title":"G Suite split delivery","href":"/docs/g-suite-split-delivery"},{"title":"Google Workspace Email Migration","href":"/docs/g-suite-data-migration"},{"title":"Open Basedir Issue","href":"/docs/open-basedir-issue"},{"title":"Procedures to Create and Manage Addon Domains","hidden":true,"href":"/docs/procedures-to-create-and-manage-addon-domains"},{"title":"Remote Login / AnyDesk","href":"/docs/remote-login-anydesk"},{"title":"How to configure my email in Email clients?","hidden":true,"href":"/docs/how-to-configure-my-email-in-email-clients"}]},{"group":"Migration","pages":[{"title":"Migration","href":"/docs/migration"},{"title":"Migration Plesk to cPanel and cPanel to Plesk","hidden":true,"href":"/docs/migration-plesk-to-cpanel-and-cpanel-to-plesk"}]},{"group":"FTP-HELP","pages":[{"title":"FTP-HELP","href":"/docs/ftp-help"},{"title":"Create FTP account in Cpanel","href":"/docs/create-ftp-account-in-cpanel"},{"title":"How to Access your website files through FTP?","href":"/docs/how-to-access-your-website-files-through-ftp"},{"title":"cPanel FTP Sessions","href":"/docs/cpanel-ftp-sessions"},{"title":"Can I Change cPanel and FTP Password in Linux","href":"/docs/can-i-change-cpanel-and-ftp-password-in-linux"}]},{"title":"WordPress Shared OviPanel","href":"/docs/wordpress-shared-ovipanel"},{"group":"Error Troubleshoot","pages":[{"title":"Error Troubleshoot","href":"/docs/error-troubleshoot"},{"title":"RAM Usage / Why more memory (RAM) is used by my server?","href":"/docs/ram-usage-why-more-memory-ram-is-used-by-my-server"},{"title":"Filezilla not connecting, Connecting Error","href":"/docs/filezilla-not-connecting-connecting-error"},{"title":"My Website is loading slow","href":"/docs/my-website-is-loading-slow-2"},{"title":"Forbidden Error no permission to access on server","href":"/docs/forbidden-error-no-permission-to-access-on-server"},{"title":"Explained - FAQ on server load high or more.","href":"/docs/explained-faq-on-server-load-high-or-more"},{"title":"How To Set up a Database using the MySQL Database Wizard?","href":"/docs/how-to-set-up-a-database-using-the-mysql-database-wizard"},{"title":"Disk Overused Issue","href":"/docs/disk-overused-issue"},{"title":"How to remove .php, .html, extensions using .htaccess.","href":"/docs/how-to-remove-php-html-extensions-using-htaccess"},{"title":"Error 503 - Service Temporarily Unavailable on Magento Sites","href":"/docs/error-503-service-temporarily-unavailable-on-magento-sites"},{"title":"How to Open Port in Linux","href":"/docs/how-to-open-port-in-linux"},{"title":"Internal Server Error - Linux","href":"/docs/internal-server-error-linux"},{"title":"Website is not opening or Having problem in visiting the website","href":"/docs/website-is-not-opening-or-having-problem-in-visiting-the-website"},{"title":"Why smart server is best compared to normal dedicated server?","href":"/docs/why-smart-server-is-best-compared-to-others"}]},{"group":"wordpress","pages":[{"title":"wordpress","href":"/docs/wordpress"},{"title":"PHP version change or WordPress version change","href":"/docs/php-version-change-or-wordpress-version-change"},{"title":"Already WordPress is installed in softaculous","href":"/docs/already-wordpress-is-installed-in-softaculous"},{"title":"Quick WordPress Migration With Migration Guru Plugin","href":"/docs/quick-wordpress-migration-with-migration-guru-plugin"},{"title":"WordPress Security Tips Updated 2021","href":"/docs/wordpress-security-tips-updated-2021"},{"title":"WordPress website EDITOR Missing from Appearance Menu","href":"/docs/wordpress-website-editor-missing-from-appearance-menu"},{"title":"What is WordPress Multisite?","href":"/docs/what-is-wordpress-multisite"},{"title":"Troubleshoot the blank pages in wordpress","href":"/docs/troubleshoot-the-blank-pages-in-wordpress"},{"title":"Wordpress - Malware / Phishing / hacked website, What to do ?","href":"/docs/wordpress-malware-phishing-hacked-website-what-to-do"}]},{"group":"Email-Help","pages":[{"title":"Email-Help","href":"/docs/email-help"},{"title":"Get unsolicited Emails or phone calls after registering the domain name and web hosting with us.","href":"/docs/get-unsolicited-emails-or-phone-calls-after-registering-the-domain-name-and-web-hosting-with-us"},{"title":"How to add a DKIM TXT record to the domain?","href":"/docs/how-to-add-a-dkim-txt-record-to-the-domain"},{"title":"How to create a mailing list?","href":"/docs/how-to-create-a-mailing-list-in-plesk"},{"title":"Emails How Tos","href":"/docs/emails-how-tos"},{"title":"How to add Email Signature in Android?","href":"/docs/how-to-add-email-signature-in-android"},{"title":"How to do Email configuration for Windows?","href":"/docs/how-to-do-email-configuration-for-windows"},{"title":"How to set Email configuration For iPhone?","href":"/docs/how-to-set-email-configuration-for-iphone"},{"title":"How to add Email Signature in Windows Phone?","href":"/docs/how-to-add-email-signature-in-windows-phone"},{"title":"How to add an Email Signature on an iPhone?","href":"/docs/how-to-add-email-signature-in-iphone"},{"title":"How to add an email signature in Outlook?","href":"/docs/how-to-add-an-email-signature-in-outlook"},{"title":"How to Configure Email Routing?","href":"/docs/how-to-configure-email-routing"},{"title":"Creating and Managing Email Accounts","href":"/docs/creating-and-managing-email-accounts"},{"title":"How to Create an Email Account Forwarder?","href":"/docs/how-to-create-an-email-account-forwarder"},{"title":"How to Create and Manage Subdomains?","href":"/docs/how-to-create-and-manage-subdomains"},{"title":"How to publish a site using Adobe Muse","href":"/docs/how-to-publish-a-site-using-adobe-muse"},{"title":"How to adjust the time zone of Webmail","href":"/docs/how-to-adjust-the-time-zone-of-webmail"},{"title":"How to set up a catch-all email address","href":"/docs/how-to-set-up-a-catch-all-email-address"},{"title":"How to set Email Signatures in WebMail","href":"/docs/how-to-set-email-signatures-in-webmail"},{"title":"How to access my emails in webmail?","href":"/docs/how-to-access-my-emails-in-webmail"},{"group":"Configuring E-Mail in Android Phones","pages":[{"title":"Configuring E-Mail in Android Phones","href":"/docs/configuring-e-mail-in-android-phones"},{"title":"Manually Set Up E-mail with Windows Live Mail using POP3","href":"/docs/manually-set-up-e-mail-with-windows-live-mail-using-pop3"}]},{"title":"How to test PHP email functionality","href":"/docs/how-to-test-php-email-functionality"},{"title":"Outlook E-Mail Configuration","href":"/docs/outlook-e-mail-configuration"},{"title":"Email configuration setting for POP3 Account?","href":"/docs/email-configuration-setting-for-pop3-account"}]},{"group":"cPanel Article","pages":[{"title":"cPanel Article","href":"/docs/cpanel-article"},{"title":"How to Reset cPanel password from HostingRaja ClientArea","href":"/docs/how-to-reset-cpanel-password-from-hostingraja-clientarea"},{"title":"Installing a Free SSL via the cPanel AutoSSL Feature","href":"/docs/installing-a-free-ssl-via-the-cpanel-autossl-feature"},{"title":"Reseller cPanel invoice credits","href":"/docs/reseller-cpanel-invoice-credits"},{"title":"How to enable “short-open-tag” On in cPanel","href":"/docs/how-to-enable-short-open-tag-on-in-cpanel"},{"title":"How to calculate my CPU usage in cpanel","href":"/docs/how-to-calculate-my-cpu-usage-in-cpanel"},{"title":"how-to-run-the-virus-scanner-in-cpanel","hidden":true,"href":"/docs/how-to-run-the-virus-scanner-in-cpanel"},{"title":"How to configure email authentication in cPanel","href":"/docs/how-to-configure-email-authentication-in-cpanel"},{"title":"How to set up Email Default Address in cPanel","hidden":true,"href":"/docs/how-to-set-up-email-default-address-in-cpanel"},{"title":"cPanel Price hike and its impact on prices","href":"/docs/cpanel-price-hike-and-its-impact-on-prices"},{"title":"Changing File Permissions in cPanel","href":"/docs/changing-file-permissions-in-cpanel"},{"title":"How to Backup \u0026 Restore a Website in cPanel?","href":"/docs/how-to-backup-restore-a-website-in-cpanel"},{"title":"How can I reset my cPanel password for my domain?","href":"/docs/how-can-i-reset-my-cpanel-password-for-my-domain"},{"title":"How to Configure Cpanel Email ID in Gmail","href":"/docs/how-to-configure-cpanel-email-id-in-gmail"},{"title":"How to login using SSH Key in cPanel","href":"/docs/how-to-login-using-ssh-key-in-cpanel"},{"title":"How to Change cPanel Style?","hidden":true,"href":"/docs/how-to-change-cpanel-style"},{"title":"Choosing the PHP Version in cPanel Host Services","href":"/docs/choosing-the-php-version-in-cpanel-host-services"},{"title":"cPanel File Manager : How to Move a File to a Folder?","href":"/docs/cpanel-file-manager-how-to-move-a-file-to-a-folder"},{"title":"How to Add an Apache Handler in cPanel?","href":"/docs/how-to-add-an-apache-handler-in-cpanel"},{"title":"Import your Email Accounts and Forwarders into cPanel","href":"/docs/import-your-email-accounts-and-forwarders-into-cpanel"},{"title":"How to configure the MIME types in cPanel?","href":"/docs/how-to-configure-the-mime-types-in-cpanel"},{"title":"How to generate the CSR certificate for particular domain in cPanel?","href":"/docs/how-to-generate-the-csr-certificate-for-particular-domain-in-cpanel"},{"title":"How to use the backup wizard in cpanel?","href":"/docs/how-to-use-the-backup-wizard-in-cpanel"},{"title":"How to create and manage mailing lists in cPanel?","href":"/docs/how-to-create-and-manage-mailing-lists-in-cpanel-1"},{"title":"How to Install Applications in cPanel?","href":"/docs/how-to-install-applications-in-cpanel"},{"title":"How to Protect Directories with a Password in cPanel","href":"/docs/how-to-protect-directories-with-a-password-in-cpanel"},{"title":"How to Create Custom Error Pages in cPanel?","href":"/docs/how-to-create-custom-error-pages-in-cpanel"},{"title":"Linux - Setting up AutoResponders in cPanel","href":"/docs/setting-up-autoresponders-in-cpanel"},{"title":"Upload your website files in cPanel","href":"/docs/upload-your-website-files-in-cpanel"},{"title":"Migration of http to https in Cpanel","href":"/docs/migration-of-http-to-https-in-cpanel"},{"title":"Linux Shared - Disk Usage in a cPanel","href":"/docs/disk-usage-in-a-cpanel"},{"title":"Linux Hosting - cPanel Images","href":"/docs/linux-hosting-cpanel-images"},{"title":"Statistics and Dashboard in a cPanel","href":"/docs/statistics-and-dashboard-in-a-cpanel"},{"title":"Create a spam email filter In cPanel","href":"/docs/create-a-spam-email-filter-in-cpanel"},{"title":"Create an Email Filter In cPanel","href":"/docs/create-an-email-filter-in-cpanel"},{"title":"How to create a cPanel account in WHM","href":"/docs/how-to-create-a-cpanel-account-in-whm"},{"title":"About Joomla and How to install Joomla on cPanel","href":"/docs/about-joomla-and-how-to-install-joomla-on-cpanel"},{"title":"how to install wordpress on cpanel","href":"/docs/how-to-install-wordpress-on-cpanel"},{"title":"how to set up cron jobs in cpanel","href":"/docs/how-to-set-up-cron-jobs-in-cpanel"},{"title":"How to configure e-mail authentication in cPanel","href":"/docs/how-to-configure-e-mail-authentication-in-cpanel"},{"title":"How Do I Increase The PHP Upload Limits in cPanel?","href":"/docs/how-do-i-increase-the-php-upload-limits-in-cpanel"}]},{"group":"How Tos","pages":[{"title":"How Tos","href":"/docs/how-tos"},{"title":"HostingRaja API Developer Document","href":"/docs/hostingraja-api-developer-document"},{"title":"How to Create SQL Database","href":"/docs/how-to-create-sql-database"},{"title":"How to Reset SA Password in SQL Server","href":"/docs/how-to-reset-sa-password-in-sql-server"},{"title":"How to Add A, MX, And Nameservers Records To DNS Zone","href":"/docs/how-to-add-a-mx-and-nameservers-records-to-dns-zone"},{"title":"How To Add A New DNS Zone And Manage DNS Records For A Domain Hosted On Windows VPS in RDP","href":"/docs/how-to-add-a-new-dns-zone-and-manage-dns-records-for-a-domain-hosted-on-windows-vps-in-rdp"},{"title":"How to add domain and subdomain in Internet","href":"/docs/how-to-add-domain-and-subdomain-in-internet"},{"title":"How to install an SSL certificate in plesk panel in vps","href":"/docs/how-to-install-an-ssl-certificate-in-plesk-panel-in-vps"},{"title":"How to Install Free SSL on Plesk Control Panel","href":"/docs/how-to-install-free-ssl-on-plesk-control-panel"},{"title":"How to install a Free Plesk License Key","href":"/docs/how-to-install-a-free-plesk-license-key"},{"title":"Cloud Office Startup Tutorial","href":"/docs/cloud-office-startup-tutorial"},{"title":"How to Redirect Domain","href":"/docs/how-to-redirect-domain"},{"title":"how to install NextJS with NodeJS in Ovipanel","href":"/docs/how-to-install-nextjs-with-nodejs-in-ovipanel"},{"title":"How to update DNS from Client Area","href":"/docs/how-to-update-dns-from-client-area"},{"title":"How to change Email/Phone in HostingRaja","href":"/docs/how-to-change-email-phone-in-hostingraja-clientarea"},{"title":"How to Install SSL for particular Domain","href":"/docs/how-to-install-ssl-for-particular-domain"},{"title":"How to set the Auto BCC for an email account","href":"/docs/how-to-set-the-auto-bcc-for-an-email-account"},{"title":"How to take backup of emails and restore in shared Linux webmail","href":"/docs/how-to-take-backup-of-emails-and-restore-in-shared-linux-webmail"},{"title":"How to block a specific IP address from accessing the website","href":"/docs/how-to-block-a-specific-ip-address-from-accessing-the-website"},{"title":"How to Use HostingRaja Site Builder","href":"/docs/how-to-use-hostingraja-site-builder"},{"title":"How to create a website instantly?","href":"/docs/how-to-create-a-website-instantly"},{"title":"How to secure your Wordpress website","href":"/docs/how-to-secure-your-wordpress-website"},{"title":"How to Connect to the MySQL Database","href":"/docs/how-to-connect-to-the-mysql-database"},{"title":"How to check Mail Log in a Dedicated Box using WHM?","href":"/docs/how-to-check-mail-log-in-a-server-using-whm"},{"title":"How to Configure CSF on Linux","href":"/docs/how-to-configure-csf-on-linux"},{"title":"How to improve the Website Speed by 70% in One Hour","href":"/docs/how-to-improve-the-website-speed-by-70-in-one-hour"},{"title":"How to access the SSH in shared Linux?","href":"/docs/how-to-access-the-ssh-in-shared-linux"},{"title":"How To Manage a MySQL Database with phpMyAdmin?","href":"/docs/how-to-manage-a-mysql-database-with-phpmyadmin"},{"title":"How to Reduce Page Load Time in Wordpress","href":"/docs/how-to-reduce-page-load-time-in-wordpress"},{"title":"Domain hosting how to point domain with hosting","href":"/docs/how-to-point-domain-with-hosting"},{"title":"How to Enable/Disable Firewall","href":"/docs/how-to-enabledisable-firewall"},{"title":"How To Add And Edit Text In HostingRaja Site Builder?","href":"/docs/how-to-add-and-edit-text-in-hostingraja-site-builder"},{"title":"How to find DNS nameserver from whm panel","href":"/docs/how-to-find-dns-nameserver-from-whm-panel"},{"title":"How to Host a Website in Windows?","href":"/docs/how-to-host-a-website-in-windows"},{"title":"How to Host a Website in Linux","href":"/docs/how-to-host-a-website-in-linux"},{"title":"How to take backup from one server and move to another server using SSH","href":"/docs/how-to-take-backup-from-one-server-and-move-to-another-server-using-ssh"},{"title":"How to resolve the error establishing a Database connection","href":"/docs/how-to-resolve-the-error-establishing-a-database-connection"},{"title":"How to create a MySQL / MSSQL database in Plesk","href":"/docs/how-to-create-a-mysql-mssql-database-in-plesk"},{"title":"How to exclude a folder from WordPress permalink","href":"/docs/how-to-exclude-a-folder-from-wordpress-permalink"},{"title":"How to solve ERROR: Connection dropped by imap server Query: SELECT \"INBOX\" in Webmail","href":"/docs/how-to-solve-error-connection-dropped-by-imap-server-query-select-inbox-in-webmail-cpanel"},{"title":"How to set redirection for without WWW to with WWW URL in Tomcat using UrlRewriteFilter","href":"/docs/how-to-set-redirection-for-without-www-to-with-www-url-in-tomcat-using-urlrewritefilter"},{"title":"How to install WordPress Theme Manually","href":"/docs/how-to-install-wordpress-theme-manually"},{"title":"How to Open Port in Windows VPS Server Hosting","href":"/docs/how-to-open-port-in-windows"},{"title":"How to use SSH in Windows","href":"/docs/how-to-use-ssh-in-windows"},{"title":"How to send Ping results","href":"/docs/how-to-send-ping-results"},{"title":"How to point Domain with Hosting","href":"/docs/how-to-point-domain-with-host"},{"title":"How to Enable/Disable Firewall","href":"/docs/how-to-enable-disable-firewall"},{"title":"How to access your web site before DNS propagation is complete","href":"/docs/accessing-your-website-before-DNS-propagation"}]},{"title":"Nameserver details of HostingRaja","href":"/docs/name-server-details-of-hostingraja"},{"title":"INODE","href":"/docs/inode"},{"group":"How to Connect to the MySQL Database","pages":[{"title":"How to Connect to the MySQL Database","href":"/docs/how-to-connect-to-the-mysql-database-1"},{"group":"Mysql Database, Mysql Users,PHPMyAdmin","pages":[{"title":"Mysql Database, Mysql Users,PHPMyAdmin","href":"/docs/mysql-database-mysql-users-phpmyadmin"},{"title":"How to block and allow port in Windows Server","href":"/docs/how-to-block-and-allow-port-in-windows-server"},{"title":"How to take complete account backup and restore website in Plesk","href":"/docs/how-to-take-complete-account-backup-and-restore-website-in-plesk"},{"title":"Setting up a Remote MySQL Database Connection","href":"/docs/setting-up-a-remote-mysql-database-connection"}]}]},{"title":"Managed the autoscale cloud","hidden":true,"href":"/docs/managed-the-autoscale-cloud"},{"title":"How to reset email password","href":"/docs/how-to-reset-email-password"}]},{"group":"Using your hostingraja.in Panel","pages":[{"title":"Accessing Your Account on the Hosting Panel","href":"/docs/accessing-your-account-on-the-hosting-panel"},{"title":"Managing your profile in the Hosting Panel","href":"/docs/managing-your-profile-in-the-hosting-panel"},{"title":"Managing billing in the Hosting Panel","href":"/docs/managing-billing-in-the-hosting-panel"},{"title":"Viewing your support PIN","href":"/docs/viewing-your-support-pin"},{"title":"Working with tickets in the Hosting Panel","href":"/docs/working-with-tickets-in-the-hosting-panel"},{"title":"Updating the default email address for your account","href":"/docs/updating-the-default-email-address-for-your-account"},{"title":"Service-Level Access Delegation","href":"/docs/service-level-access-delegation"},{"title":"Recovering account access","href":"/docs/recovering-account-access"},{"title":"Cancelling a product or service on the Hosting Panel","href":"/docs/cancelling-a-product-or-service-on-the-hosting-panel"},{"group":"Using Your hostingraja.in Shared Panel","pages":[{"title":"Using Your hostingraja.in Shared Panel","href":"/docs/using-your-hostingrajain-shared-panel"},{"title":"Managing your email in the Hosting Panel","href":"/docs/managing-your-email-in-the-hosting-panel"},{"title":"Managing your website files in the Hosting Panel","href":"/docs/managing-your-website-files-in-the-hosting-panel"},{"title":"Managing your domains in the Hosting Panel","href":"/docs/managing-your-domains-in-the-hosting-panel"},{"title":"Requesting site migration from another host to hostingraja.in","href":"/docs/requesting-site-migration-from-another-host-to-hostingrajain"},{"title":"Managing your MySQL databases in the Hosting Panel","href":"/docs/managing-your-mysql-databases-in-the-hosting-panel"},{"title":"Managing backups in the Hosting Panel","href":"/docs/managing-backups-in-the-hosting-panel"},{"title":"Upgrading or downgrading your hosting plan","hidden":true,"href":"/docs/upgrading-or-downgrading-your-hosting-plan"},{"title":"Installing an SSL certificate in the Hosting Panel","href":"/docs/installing-an-ssl-certificate-in-the-hosting-panel"},{"title":"Changing PHP versions and settings in the Hosting Panel","href":"/docs/changing-php-versions-and-settings-in-the-hosting-panel"},{"title":"Managing FTP accounts in the Hosting Panel","href":"/docs/managing-ftp-accounts-in-the-hosting-panel"},{"title":"Managing your WordPress site in the Hosting Panel","href":"/docs/managing-your-wordpress-site-in-the-hosting-panel"},{"title":"Configuring SSH access in the Hosting Panel","href":"/docs/configuring-ssh-access-in-the-hosting-panel"},{"title":"Managing your website in the Hosting Panel","href":"/docs/managing-your-website-in-the-hosting-panel"},{"title":"Viewing and changing settings for shared hosting accounts","href":"/docs/viewing-and-changing-settings-for-shared-hosting-accounts"}]}]},{"group":"Managed hosting for WordPress powered by Rocket.net","pages":[{"title":"hostingraja.in Managed WordPress Quick Start Guide","href":"/docs/hostingcom-managed-wordpress-quick-start-guide"},{"title":"How to create a site on hostingraja.in Managed WordPress","href":"/docs/how-to-create-a-site-on-hostingrajain-managed-wordpress"},{"title":"How to manage your site on hostingraja.in Managed WordPress","href":"/docs/how-to-manage-your-site-on-hostingrajain-managed-wordpress"},{"title":"First-time login to WordPress on hostingraja.in Managed WordPress","href":"/docs/first-time-login-to-wordpress-on-hostingrajain-managed-wordpress"},{"title":"How to log in to your WordPress admin area on hostingraja.in Managed WordPress","href":"/docs/how-to-log-in-to-your-wordpress-admin-area-on-hostingrajain-managed-wordpress"},{"title":"How to install a new WordPress plugin on hostingraja.in Managed WordPress","href":"/docs/how-to-install-a-new-wordpress-plugin-on-hostingrajain-managed-wordpress"},{"title":"How to install a new WordPress theme on hostingraja.in Managed WordPress","href":"/docs/how-to-install-a-new-wordpress-theme-on-hostingrajain-managed-wordpress"},{"title":"Useful WordPress online resources for hostingraja.in Managed WordPress","href":"/docs/useful-wordpress-online-resources-for-hostingrajain-managed-wordpress"},{"title":"How to configure DNS at GoDaddy for hostingraja.in Managed WordPress","href":"/docs/how-to-configure-dns-at-godaddy-for-hostingrajain-managed-wordpress"},{"title":"How to configure DNS at Namecheap for hostingraja.in Managed WordPress","href":"/docs/how-to-configure-dns-at-namecheap-for-hostingrajain-managed-wordpress"},{"title":"How to configure DNS at Cloudflare for hostingraja.in Managed WordPress","href":"/docs/how-to-configure-dns-at-cloudflare-for-hostingrajain-managed-wordpress"},{"title":"How to configure DNS settings for hostingraja.in Managed WordPress at any provider","description":"Learn how to configure DNS settings for hostingraja.in Managed WordPress at any DNS provider.","href":"/docs/how-to-configure-dns-settings-for-hostingrajain-managed-wordpress-at-any-provider"},{"title":"How to create a staging site on hostingraja.in Managed WordPress","href":"/docs/how-to-create-a-staging-site-on-hostingrajain-managed-wordpress"},{"title":"Managing WordPress plugins from the hostingraja.in Dashboard","description":"Learn how to manage your WordPress plugins directly from the hostingraja.in Dashboard.","href":"/docs/managing-wordpress-plugins-from-the-hostingrajain-dashboard"},{"title":"Managing WordPress themes from the hostingraja.in dashboard","href":"/docs/managing-wordpress-themes-from-the-hostingrajain-dashboard"},{"title":"Manually purging the CDN cache on hostingraja.in Managed WordPress","href":"/docs/manually-purging-the-cdn-cache-on-hostingrajain-managed-wordpress"},{"title":"How to use the File Manager on hostingraja.in Managed WordPress","href":"/docs/how-to-use-the-file-manager-on-hostingrajain-managed-wordpress"},{"title":"How to enable automatic core, theme, and plugin updates on hostingraja.in Managed WordPress","href":"/docs/how-to-enable-automatic-core-theme-and-plugin-updates-on-hostingrajain-managed-wordpress"},{"title":"How to manually generate and download a full cloud backup on hostingraja.in Managed WordPress","href":"/docs/how-to-manually-generate-and-download-a-full-cloud-backup-on-hostingrajain-managed-wordpress"},{"title":"How to find and restore automated backups on hostingraja.in Managed WordPress","href":"/docs/how-to-find-and-restore-automated-backups-on-hostingrajain-managed-wordpress"},{"title":"How to back up and restore a database on hostingraja.in Managed WordPress","href":"/docs/how-to-back-up-and-restore-a-database-on-hostingrajain-managed-wordpress"},{"title":"How to manage your databases with phpMyAdmin on hostingraja.in Managed WordPress","href":"/docs/how-to-manage-your-databases-with-phpmyadmin-on-hostingrajain-managed-wordpress"},{"title":"How to change the PHP version for your hostingraja.in Managed WordPress website","href":"/docs/how-to-change-the-php-version-for-your-hostingrajain-managed-wordpress-website"},{"title":"How to update, activate, and deactivate themes on hostingraja.in Managed WordPress","href":"/docs/how-to-update-activate-and-deactivate-themes-on-hostingrajain-managed-wordpress"},{"title":"How to remove a WordPress site from hostingraja.in Managed WordPress","href":"/docs/how-to-remove-a-wordpress-site-from-hostingrajain-managed-wordpress"},{"title":"Changing the WordPress language on hostingraja.in Managed WordPress","href":"/docs/changing-the-wordpress-language-on-hostingrajain-managed-wordpress"},{"title":"Using the \"All in One SEO Pack\" plugin on hostingraja.in Managed WordPress","href":"/docs/using-the-all-in-one-seo-pack-plugin-on-hostingrajain-managed-wordpress"},{"title":"Using the \"Coming Soon Page, Under Construction \u0026 Maintenance Mode\" plugin on hostingraja.in Managed WordPress","href":"/docs/using-the-coming-soon-page-under-construction-maintenance-mode-plugin-on-hostingrajain-managed-wordpress"},{"title":"Using the Autoptimize plugin on hostingraja.in Managed WordPress","href":"/docs/using-the-autoptimize-plugin-on-hostingrajain-managed-wordpress"},{"title":"Grow your business with the OptinMonster API on hostingraja.in Managed WordPress","href":"/docs/grow-your-business-with-the-optinmonster-api-on-hostingrajain-managed-wordpress"},{"title":"Improving mail delivery with the WP Mail SMTP plugin on hostingraja.in Managed WordPress","href":"/docs/mproving-mail-delivery-with-the-wp-mail-smtp-plugin-on-hostingrajain-managed-wordpress"},{"title":"How to create an FTP account on hostingraja.in Managed WordPress","href":"/docs/how-to-create-an-ftp-account-on-hostingrajain-managed-wordpress"},{"title":"How to use FTP with Cyberduck on hostingraja.in Managed WordPress","href":"/docs/how-to-use-ftp-with-cyberduck-on-hostingrajain-managed-wordpress"},{"title":"How to use FTP with FileZilla Pro on hostingraja.in Managed WordPress","href":"/docs/how-to-use-ftp-with-filezilla-pro-on-hostingrajain-managed-wordpress"},{"title":"How to enable SSH on your hostingraja.in Managed WordPress site","href":"/docs/how-to-enable-ssh-on-your-hostingrajain-managed-wordpress-site"},{"title":"How to use SFTP on hostingraja.in Managed WordPress","href":"/docs/how-to-use-sftp-on-hostingrajain-managed-wordpress"},{"title":"Using the WordPress Activity Log on hostingraja.in Managed WordPress","href":"/docs/using-the-wordpress-activity-log-on-hostingrajain-managed-wordpress"},{"title":"Understanding the Managed WordPress CDN (Content Delivery Network)","href":"/docs/understanding-the-managed-wordpress-cdn-content-delivery-network"},{"title":"Does my hostingraja.in Managed WordPress site need a caching plugin?","href":"/docs/does-my-hostingrajain-managed-wordpress-site-need-a-caching-plugin"},{"title":"What is Cloudflare Enterprise and how does it benefit my site?","href":"/docs/what-is-cloudflare-enterprise-and-how-does-it-benefit-my-site"},{"title":"Cloudflare Error 1016: Origin DNS Error","href":"/docs/cloudflare-error-1016-origin-dns-error"},{"title":"Do my hostingraja.in Managed WordPress sites need dedicated IP addresses?","href":"/docs/do-my-hostingcom-managed-wordpress-sites-need-dedicated-ip-addresses"},{"title":"Are any WordPress plugins or themes banned on hostingraja.in Managed WordPress?","href":"/docs/are-any-wordpress-plugins-or-themes-banned-on-hostingrajain-managed-wordpress"},{"title":"Site speed and bandwidth usage on hostingraja.in Managed WordPress","href":"/docs/site-speed-and-bandwidth-usage-on-hostingrajain-managed-wordpress"},{"title":"Do I need to use an image optimization plugin or CDN on hostingraja.in Managed WordPress?","href":"/docs/do-i-need-to-use-an-image-optimization-plugin-or-cdn-on-hostingrajain-managed-wordpress"},{"title":"What is the difference between visitors on the hostingraja.in Dashboard and pageviews on Google Analytics?","href":"/docs/what-is-the-difference-between-visitors-on-the-hostingrajain-dashboard-and-pageviews-on-google-analytics"},{"title":"hostingraja.in Managed WordPress CDN cache FAQ","href":"/docs/hostingrajain-managed-wordpress-cdn-cache-faq"},{"title":"Viewing WordPress error logs in the File Manager on hostingraja.in Managed WordPress","href":"/docs/viewing-wordpress-error-logs-in-the-file-manager-on-hostingrajain-managed-wordpress"},{"title":"Adding a subdomain to a website on hostingraja.in Managed WordPress","href":"/docs/adding-a-subdomain-to-a-website-on-hostingrajain-managed-wordpress"},{"title":"Using WP-CLI in the hostingraja.in Dashboard","href":"/docs/using-wp-cli-in-the-hostingrajain-dashboard"},{"title":"How to use SSH and WP-CLI from the command line on hostingraja.in Managed WordPress","href":"/docs/how-to-use-ssh-and-wp-cli-from-the-command-line-on-hostingrajain-managed-wordpress"},{"title":"Giving access to individual sites on hostingraja.in Managed WordPress","href":"/docs/giving-access-to-individual-sites-on-hostingrajain-managed-wordpress"},{"title":"Viewing Cloudflare bandwidth and Edge Analytics in the hostingraja.in Dashboard","href":"/docs/viewing-cloudflare-bandwidth-and-edge-analytics-in-the-hostingrajain-dashboard"},{"title":"Changing the domain name of a website on hostingraja.in Managed WordPress","href":"/docs/changing-the-domain-name-of-a-website-on-hostingrajain-managed-wordpress"},{"title":"Migrating to hostingraja.in Managed WordPress","href":"/docs/migrating-to-hostingrajain-managed-wordpress"},{"title":"Viewing combined statistics for your hostingraja.in Managed WordPress sites","href":"/docs/viewing-combined-statistics-for-your-hostingrajain-managed-wordpress-sites"},{"title":"How to manage site security on hostingraja.in Managed WordPress","href":"/docs/how-to-manage-site-security-on-hostingrajain-managed-wordpress"},{"title":"How to view site reporting statistics on hostingraja.in Managed WordPress","href":"/docs/how-to-view-site-reporting-statistics-on-hostingrajain-managed-wordpress"},{"title":"Getting started with WooCommerce on hostingraja.in Managed WordPress","href":"/docs/getting-started-with-woocommerce-on-hostingrajain-managed-wordpress"},{"title":"Using the WP Rocket plugin on hostingraja.in Managed WordPress","href":"/docs/using-the-wp-rocket-plugin-on-hostingrajain-managed-wordpress"},{"title":"How to integrate SendGrid with your hostingraja.in Managed WordPress site","href":"/docs/how-to-integrate-sendgrid-with-your-hostingrajain-managed-wordpress-site"},{"title":"How many emails can I send through hostingraja.in Managed WordPress?","href":"/docs/how-many-emails-can-i-send-through-hostingrajain-managed-wordpress"}]},{"group":"Enhance Control Panel","pages":[{"title":"From cPanel to Enhance. Everything you need to know.","hidden":true,"href":"/docs/from-cpanel-to-enhance-everything-you-need-to-know"},{"title":"Managing your website, databases, and backups in Enhance","href":"/docs/managing-your-website-databases-and-backups-in-enhance"},{"title":"Managing your WordPress site in Enhance","href":"/docs/managing-your-wordpress-site-in-enhance"},{"title":"Installing an SSL certificate in Enhance","href":"/docs/installing-an-ssl-certificate-in-enhance"},{"title":"Managing your Domains in Enhance","href":"/docs/managing-your-domains-in-enhance"},{"title":"Managing your Email in Enhance","href":"/docs/managing-your-email-in-enhance"},{"title":"Using the File Manager in Enhance","href":"/docs/using-the-file-manager-in-enhance"},{"title":"Managing Backups in Enhance","href":"/docs/managing-backups-in-enhance"},{"title":"Managing your MySQL databases in Enhance","href":"/docs/managing-your-mysql-databases-in-enhance"},{"title":"Managing FTP accounts in Enhance","href":"/docs/managing-ftp-accounts-in-enhance"},{"title":"Changing PHP versions and settings in Enhance","href":"/docs/changing-php-versions-and-settings-in-enhance"},{"title":"Configuring SSH access in Enhance","href":"/docs/configuring-ssh-access-in-enhance"}]}]},"title":"How to create a staging site on hostingraja.in Managed WordPress - HostingRaja Help","buildId":"dpl_cadrRc5H9XQiJQbDFN5mcYRs2PAj","deploymentId":"dpl_cadrRc5H9XQiJQbDFN5mcYRs2PAj","dynamics":["a74be98ba7"],"chunks":["zoom-image-lightbox-B0E5HDf_.js","lightbox-handle-r17bVUz3.js"]}